#8 Flow, Layout, and Traffic Patterns That Improve Organization
In our last column, How to Solve 80% of Disorganization Fast: Flow, Layout, Traffic Patterns and Work Progression, we introduced the concept of making your furniture, layout, and workflow more organized.
We used water flow as a comparison, to more easily identify how to keep things moving — your way.
In this column you’ll find illustrations of exactly how flow can work or not work for you, and how to set up your work space to improve not only organization, but even communication, productivity, and profits.
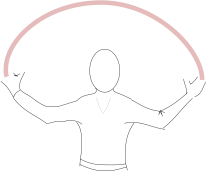
Remember this? “Your arms move like a bird's wings (think of your reach as your "wingspan.”) Try this: sit down, lean back in your chair, stretch both arms out, and spin around in a circle. You’ll see that your fingertips "draw" an arc around you.”
Here’s how to set up your work area to reflect your actual movements.
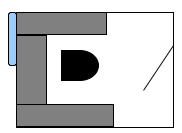
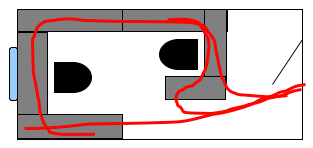
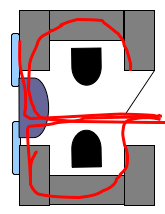
First, let’s look at three typical work areas and why they don’t work. In these illustrations, the blue bars on the left are windows, the gray rectangles are desks, and the slants on the right are doors, showing which direction they open:
Now let’s pretend water is pouring in through the doors, to emulate workflow. (Yes, work comes in via electronics on your desktop or laptop, and your phone; but you still have stuff coming in via your printer, mail and packages, — and some people still use fax machine. However, you have more stuff coming in than even that: you may have sample books, office supplies, equipment, even food and other items that are carried in and moved around by hand. Think stuff, not just paper. (More on this coming up.)
And if you work remotely from various locations, it's even more important to understand flow, because you may be experiencing obstructions or missing supports that aren’t spotted as easily. Not sure? Ask yourself if you have back pain, "tension" headaches, or a sore neck. All these can be improved with layout changes.
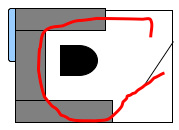
Now let’s look at the red lines as the typical flow of stuff: Most of your stuff is carried in by hand, and goes to the first hand-height surface available, because you’re not going to bring stuff in and put it on the floor, walls, or ceiling (usually!) It’s normal to put stuff in the most convenient place. So when only rectangular, single desks are available, that’s where your stuff is going to go (yes, some will land on the floor.) The red “knots” below represent piles or collections of items as they flow, given the layout and furniture arrangements.
Does your work space flow look piled up like this?
Remember, stuff lands, stops, and stays wherever there is a convenient piece of hand-height furniture.
Many of the “normal” organizing books, podcasts, and shows try to get you to change your behavior and rearrange your stuff. This concept is different: it proposes that you make a convenient flow path for your stuff. It posits that most people don’t have enough work area, so it creates more space for stuff in such a way that it flows around you logically and lets you work in peace without demanding you corral, discipline, or babysit your stuff.
In other words, why not let your work area take care of you?
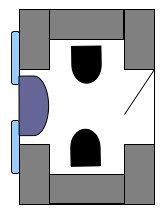
In our last column, we also talked about U-shaped work areas as best for supporting the human body and natural flow. Let’s try it with our red lines and see how adding or rearranging furniture can give you a peaceful, organized work area. Below I’ve first rearranged the furniture to create U-shaped work areas that fit and channel things around you.
With just these new furniture arrangements alone, you get more work area and a clear path for your stuff. You even get to look out the window! Then keep scrolling to see the new flow.
Now you’ll see how smoothly your work can flow in the new arrangements.
Note that these new arrangements even allow for both left-handed and right-handed people, and make space for more than one person in the last two.
They also help you to:
• reach everything on your work surface easily without stressing your back or neck
• transition smoothly from one project to another
• minimize the time it takes to recover from interruptions
• support the Seven Stations we covered in the last column (note the bookcase on the left side: it’s a short one that stands on the desk top, serves as storage, and can hold items that are awaiting a response.)
FURTHER FURNITURE ARRANGEMENT TIPS:
• Move your furniture until you can sit in the middle of your U-shaped configuration and reach all three surfaces without leaning.
• Don’t place the computer monitor so that it faces a window, or you’ll end up with a glare on the screen.
• Be sure you’ve left enough room to open your desk drawers and push your chair back. Usually forty to forty-three inches is about right for pushback. Measure from the edge of the desk (at your belly) to the wall or furniture behind your chair.
• Put at least one side of your U -shaped work area near the door so people can drop things off without invading your space.
• Make sure you can reach your most-needed stuff from your chair without straining.
• Avoid gaps between furniture because paper and stuff can “drip” into the cracks.
SUMMARY:
By working with your natural movements, and by arranging your area so things can flow, you’ll feel more organized without having to babysit your stuff. Instead, it will take care of you!
BOTTOM LINE:
Your furniture layout may have been the cause of your disorganization all along. Now you can truly understand how it wasn’t your fault!
Got questions? Please click "Leave A Comment" below and let us know what you think!
COMING UP IN THE NEXT ISSUE:
Blockers and Catchers: furniture arrangements that help or hurt your new-found organization. Cords and cables, and how not to trip over them. Where to start?
How To Get Organized...Without Resorting To Arson! is a reader-supported publication. To receive new posts and support my work, consider becoming a free or paid subscriber.

